How we reinforce walls for a safe bathroom
Last updated 13 June 2026 · 6 min read
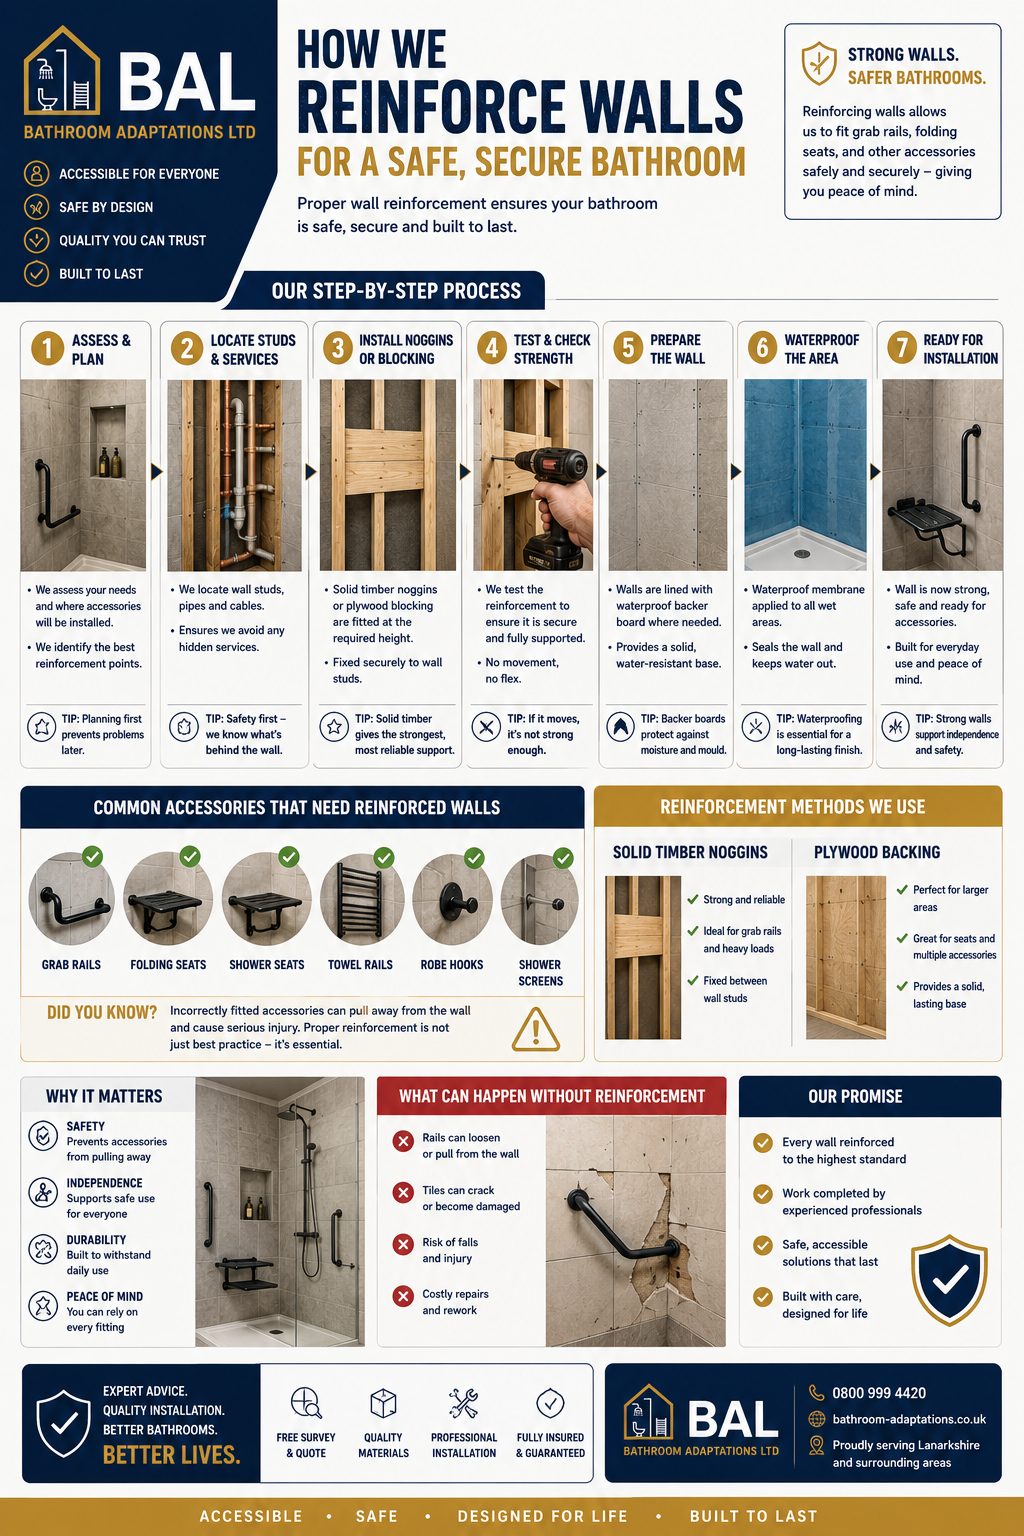
Wall reinforcement is one of the details that separates a surface-level bathroom update from a genuinely safe adaptation. Grab rails, folding seats, shower seats and support accessories all need more than plasterboard behind them.
This guide explains how installers reinforce walls, what materials are commonly used and why this hidden work matters so much for long-term safety.
Step-by-step summary
Step 1
Assess and plan
Confirm what accessories will be fitted and where support is needed.
Step 2
Locate studs and services
Identify wall structure while avoiding pipes and cables.
Step 3
Install noggins or blocking
Fit solid timber or plywood backing between the studs.
Step 4
Test strength
Check that the reinforcement is secure and properly fixed.
Step 5
Board the wall
Line the area with suitable backer boards to create a stable surface.
Step 6
Waterproof the area
Protect the wall system before the visible finish is installed.
Step 7
Fit the accessories
Install rails, seats or other fittings into the prepared reinforced zones.
Which fittings usually need reinforcement
Any item that takes body weight, leverage or repeated force should be planned around solid backing. In accessible bathrooms, that often includes more fittings than people expect.
- Grab rails
- Fold-down shower seats
- Fixed shower seats
- Heavy screens and support bars
- Some towel rails and accessory points
Noggins vs plywood backing
Solid timber noggins are often ideal for precise fixing positions such as grab rails. Plywood backing can be useful across a wider area when positions may vary or multiple accessories will be fitted.
The right choice depends on the wall construction, the fitting loads and how much flexibility is needed later.
- Noggins provide targeted strength at known fixing points.
- Plywood backing can support broader installation zones.
- Both systems still need secure fixing into the main wall structure.
What happens if reinforcement is skipped
Without proper backing, fittings can loosen, tiles can crack and the wall can fail under load. In a room designed for safety and independence, that is a risk worth avoiding completely.
Reinforcement is hidden once the job is complete, but it is one of the most valuable parts of the work.
Frequently asked questions
Do all bathroom walls need reinforcing?
No, only the areas where support fittings or heavy loads are expected. The key is planning those zones before the wall is closed up.
Can reinforcement be added to an existing bathroom wall?
Yes, but it usually means opening the wall and then making it good again, which is why it is best planned during a larger adaptation job.
Is waterproofing still needed after reinforcement?
Yes. Reinforcement adds strength, but wet areas still need a proper waterproof system before the final finish is applied.
Related guides
Need help with the job itself?
We install accessible bathrooms, walk-in showers and wet rooms across Central Scotland.