How grab rails are installed safely
Last updated 13 June 2026 · 6 min read
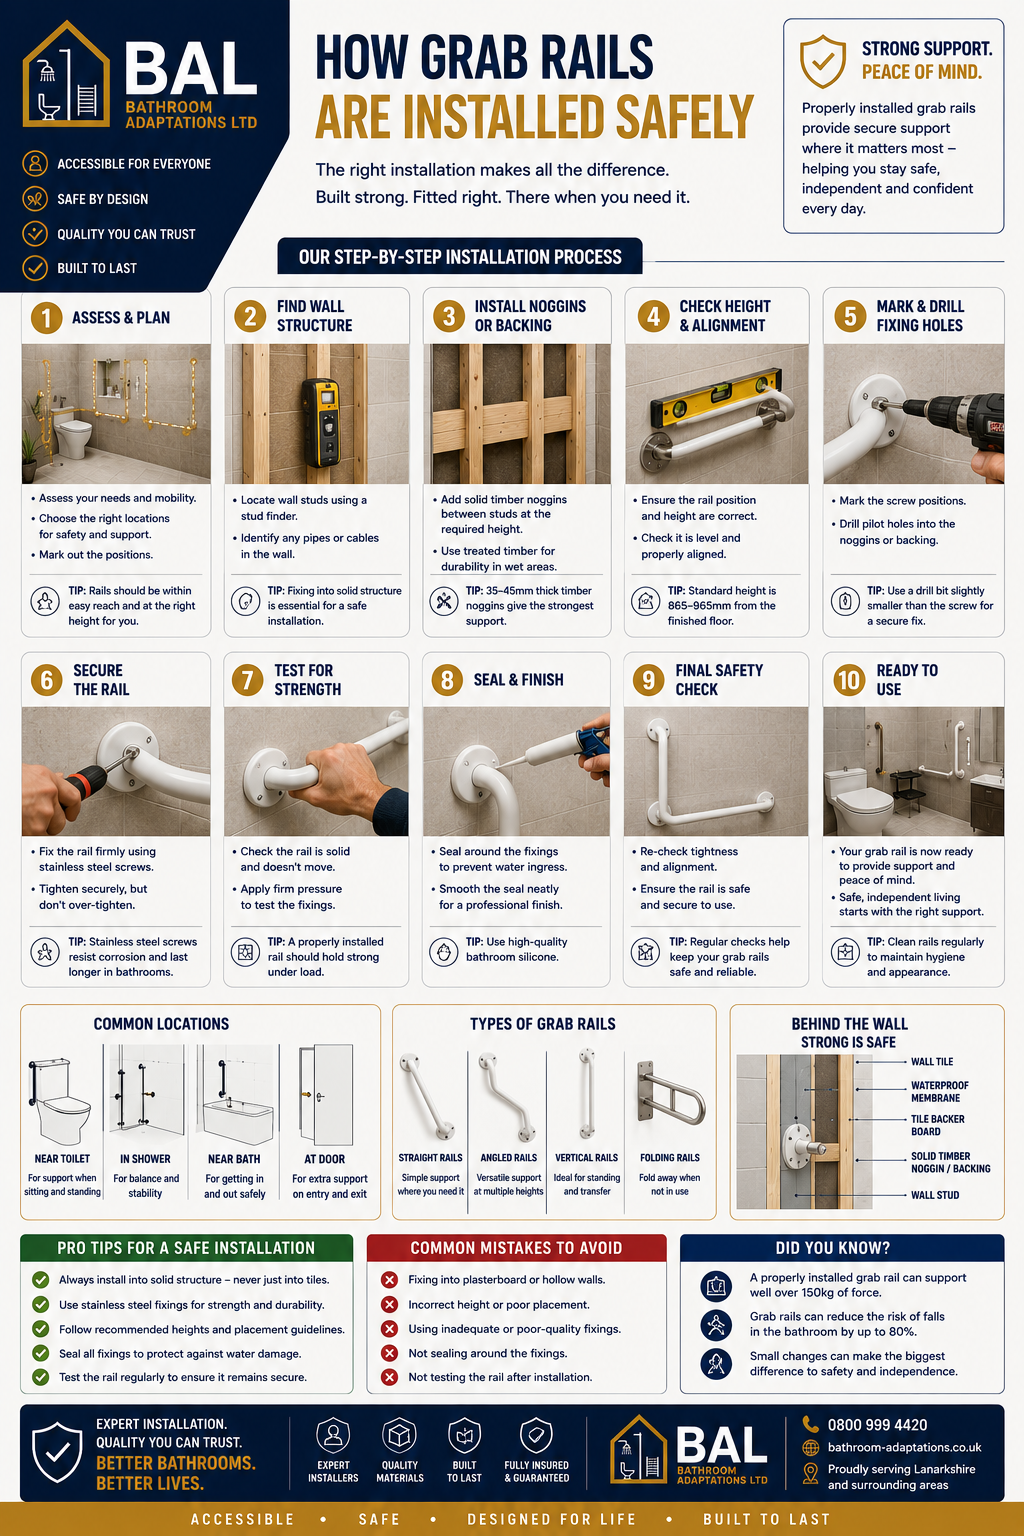
A grab rail only improves safety if it is fixed into solid structure at the correct height and position. Installing one badly can create a false sense of support, which is why the backing behind the wall matters just as much as the rail itself.
This guide walks through the steps a professional installer should follow when fitting bathroom grab rails near toilets, showers, baths and entrances.
Step-by-step summary
Step 1
Assess and plan
Decide exactly where support is needed for safe movement and transfers.
Step 2
Find wall structure
Locate studs, pipes and cables before drilling any holes.
Step 3
Install backing if needed
Add timber noggins or other solid support where the rail will fix.
Step 4
Check height and alignment
Make sure the position is practical, level and suited to the user.
Step 5
Mark and drill
Set out fixings accurately and drill clean pilot holes into solid support.
Step 6
Secure the rail
Fix the rail firmly using suitable corrosion-resistant screws.
Step 7
Seal and test
Seal around the fixings and confirm the rail feels solid under load.
Why fixing into solid structure matters
Tiles, plasterboard and decorative surfaces are not enough on their own. The load needs to transfer into solid backing so the rail can support repeated use safely over time.
That is why professional installations often involve checking the wall build-up or opening the area during a larger bathroom adaptation project.
- Fixings should bite into studs, noggins or other solid reinforcement.
- Stainless hardware helps resist corrosion in humid bathrooms.
- Sealant around the fixing points helps stop water ingress.
Common locations for grab rails
The right position depends on the user and how they move around the room. Typical spots include beside the toilet, in the shower, near the bath and at the entrance to the bathroom.
- Beside toilets for sitting and standing support
- Inside shower areas for stability while washing
- Near baths for getting in and out more safely
- At doorways or transitions for extra confidence
Mistakes worth avoiding
The most common failures are all preventable. They usually happen when speed is prioritised over proper structure and layout checks.
- Fixing into hollow walls with inadequate anchors
- Placing the rail at the wrong height or angle for the user
- Skipping sealing around the fixings
- Not pressure-testing the rail before handover
Frequently asked questions
Can grab rails be fitted onto tiled walls?
Yes, but the important thing is what is behind the tile. The rail still needs solid support, not just a neat finish on the surface.
Do grab rails need to be level?
Straight rails are usually set level unless the user needs a different orientation. Alignment should always be chosen for function first.
Can I install a grab rail anywhere I want?
Only if there is suitable structure behind the wall or proper reinforcement is added. Position must match both the wall build-up and the user’s needs.
Related guides
Need help with the job itself?
We install accessible bathrooms, walk-in showers and wet rooms across Central Scotland.