Bathroom waterproofing explained
Last updated 13 June 2026 · 6 min read
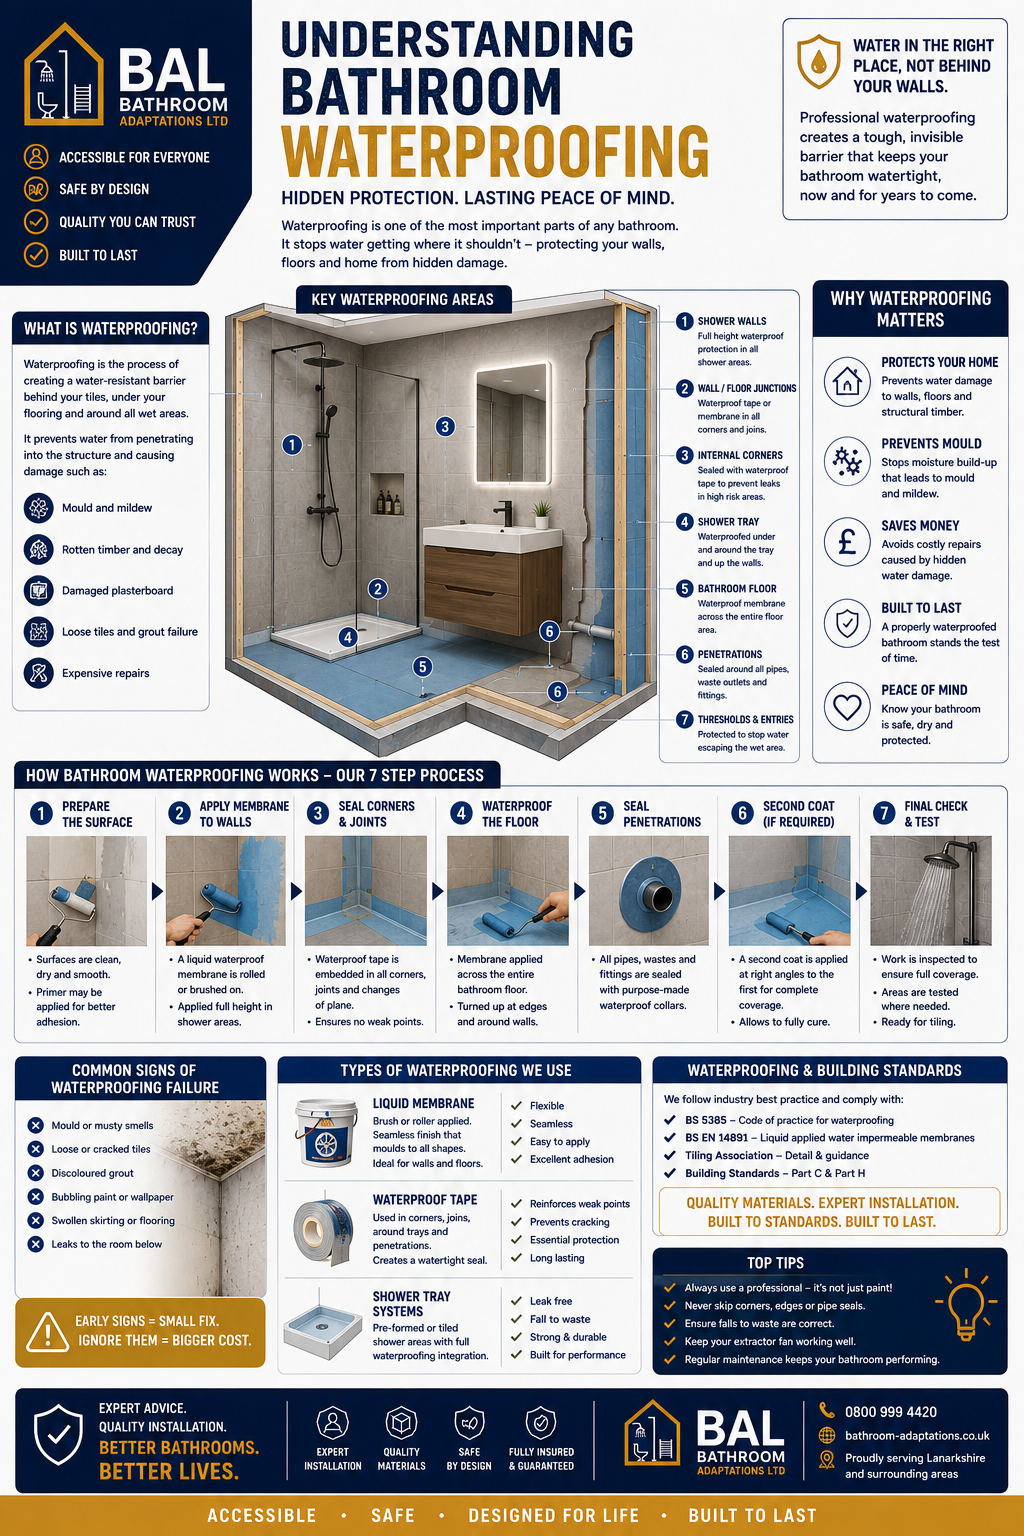
Bathroom waterproofing is what stops water getting behind tiles, into floors and into the surrounding structure. It is one of the most important parts of a shower or wet area, but it is often hidden once the job is finished.
This guide explains what should be waterproofed, how the process normally works and the warning signs that tell you a bathroom may already be failing behind the surface.
Step-by-step summary
Step 1
Prepare the surface
Clean, dry and stabilise the background so membranes and tapes bond properly.
Step 2
Apply membrane to walls
Coat shower and splash zones with the correct waterproofing membrane.
Step 3
Seal corners and joints
Bed waterproof tape into internal corners and all changes of plane.
Step 4
Waterproof the floor
Apply the membrane across the bathroom floor, turning it up at edges where needed.
Step 5
Seal penetrations
Protect pipes, wastes and fixings using collars and proper local sealing.
Step 6
Apply second coat if required
Build full coverage to the manufacturer’s specification before finishing.
Step 7
Final check and test
Inspect coverage and make sure the system is ready for tiling or panels.
Where waterproofing matters most
Any place that gets regular spray, standing water or repeated condensation needs more than a cosmetic finish. Shower walls, floors, junctions and tray edges are the places most likely to fail if corners are cut.
The main point is that waterproofing should sit behind the visible finish. Tiles, grout and silicone help, but they are not a substitute for a proper membrane system.
- Shower walls need full-height protection in wet zones.
- Corners and wall-to-floor joints need waterproof tape or equivalent reinforcement.
- Pipe penetrations and wastes are common weak points if not sealed properly.
- Bathroom floors need protection wherever splash, pooling or frequent mopping occurs.
Common signs a bathroom may be failing
Water damage is not always obvious at first. Many failures show up as mould, staining or movement long before a leak becomes dramatic.
- Musty smells or recurring mould
- Discoloured grout or plasterboard
- Loose tiles or soft flooring
- Cracked grout lines around trays or wall junctions
- Leaks appearing in the room below
Why a proper system saves money later
Repairing hidden water damage is far more expensive than doing the waterproofing correctly in the first place. A good system protects timber, boards, floors and finishes from slow, cumulative damage.
That matters even more in accessible bathrooms, where safety fittings and adapted layouts need long-term reliability rather than short-term patch fixes.
Frequently asked questions
Is silicone alone enough to waterproof a bathroom?
No. Silicone is a finishing seal, not the main waterproofing system. The real protection should be behind the tiles or panels.
Do all bathroom floors need waterproofing?
Not every dry-area floor is treated the same, but shower zones, wet rooms and splash-prone areas should be properly waterproofed as part of the system.
What causes waterproofing failure?
Poor preparation, missed corners and penetrations, weak joints, wrong products, rushed drying times and relying on surface sealants instead of a full system.
Related guides
Need help with the job itself?
We install accessible bathrooms, walk-in showers and wet rooms across Central Scotland.