How to replace bathroom silicone
Last updated 13 June 2026 · 6 min read
Old silicone that has cracked, shrunk or gone mouldy will eventually let water behind the visible finish. Replacing it properly is one of the simplest ways to keep a shower tray, bath edge or basin area watertight.
The difference between a neat, long-lasting job and a messy one usually comes down to preparation. Clean surfaces, straight masking lines and the correct curing time matter more than speed.
Step-by-step summary
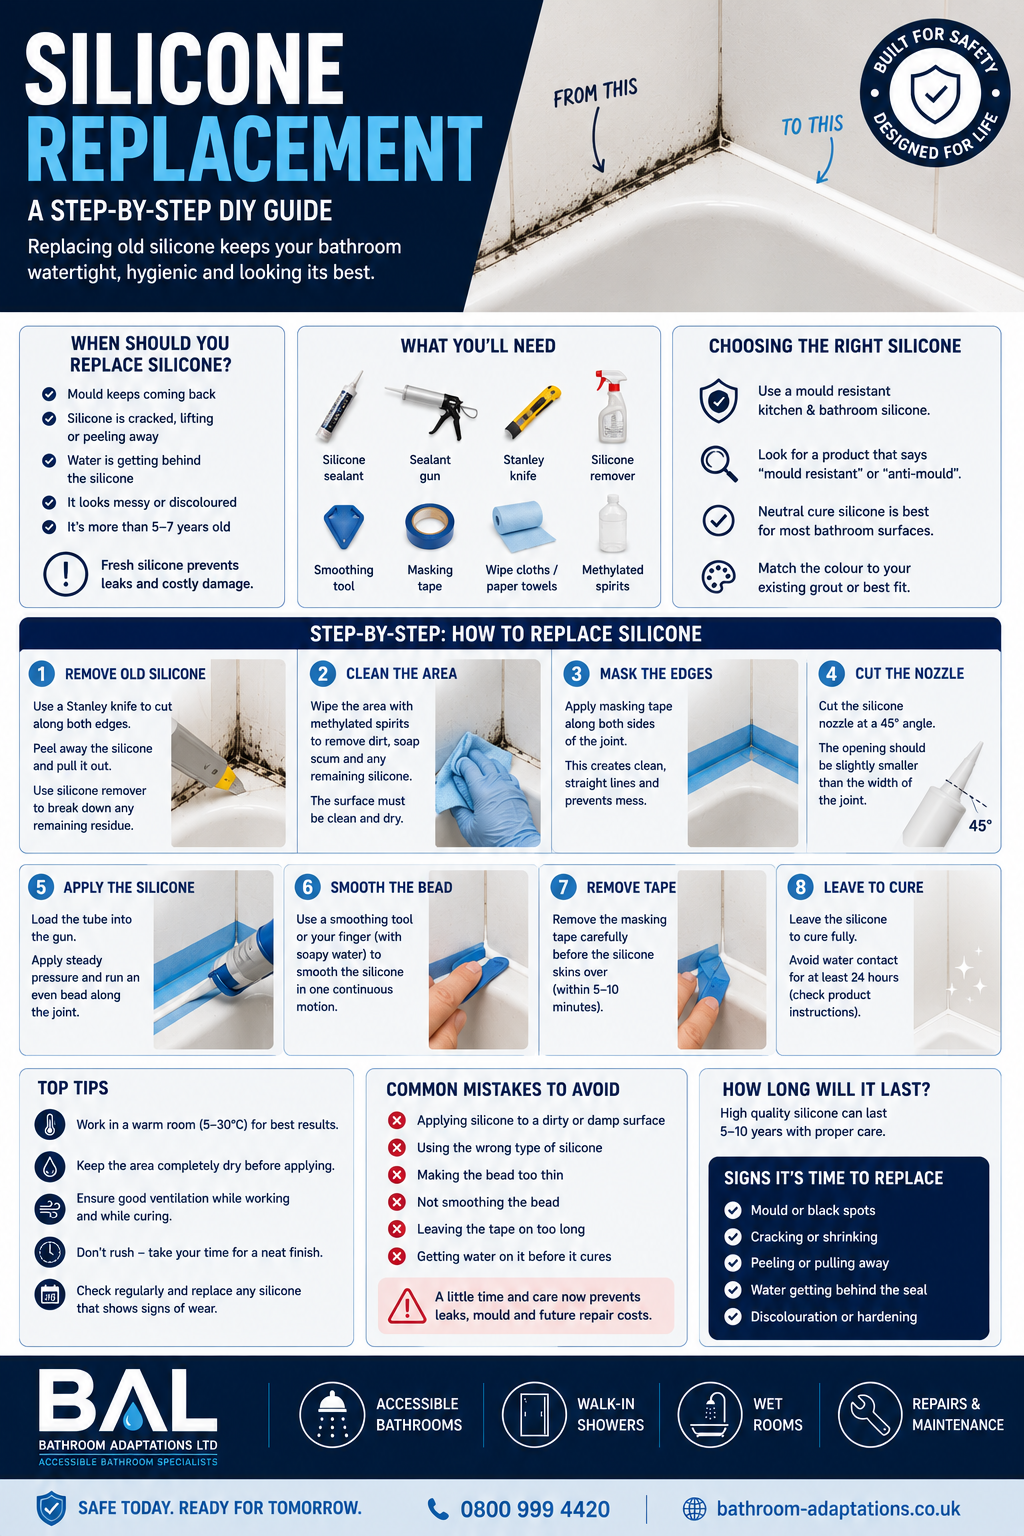
Step 1
Remove the old silicone
Cut along both sides of the existing bead and peel it away without damaging the surrounding finish.
Step 2
Clean and dry the area
Wipe away soap residue, dirt and any remover left behind, then allow the joint to dry fully.
Step 3
Mask the edges
Apply masking tape along both sides of the joint to keep the finished line straight and tidy.
Step 4
Cut the nozzle
Trim the silicone nozzle to suit the width of the joint so you do not over-apply the sealant.
Step 5
Apply the silicone
Run one steady, continuous bead through the joint instead of stopping and starting.
Step 6
Tool the bead
Smooth it immediately with a profiling tool or a wet finger so the silicone seals the joint evenly.
Step 7
Remove the tape
Pull the masking tape off before the silicone skins over to leave a crisp edge.
Step 8
Leave it to cure
Follow the product guidance and keep the area dry until the sealant has fully cured.
Where bathroom silicone usually fails
The most common problem areas are bath-to-wall joints, shower tray corners, around basins and around window reveals in wet bathrooms. Soap residue, movement, poor ventilation and cheap sealant all shorten the life of the bead.
If the area repeatedly goes black even after cleaning, the issue is often trapped moisture or old silicone that was applied over residue rather than onto a clean dry surface.
Common mistakes to avoid
Most messy or short-lived silicone jobs come down to rushing the prep or using too much product.
- Leaving old silicone fragments behind.
- Applying onto damp surfaces.
- Overfilling the joint and then dragging excess across the tiles.
- Using the bathroom before the cure time is up.
- Choosing general-purpose sealant instead of bathroom-grade mould-resistant silicone.
When replacement is better than repeated cleaning
If the silicone is brittle, lifting, split, or blackened all the way through, cleaning will not solve the underlying problem. Replacement is the right fix because the seal itself has failed.
In bathrooms with persistent condensation, replacing the silicone and improving airflow at the same time usually gives the best long-term result.
Frequently asked questions
How long should bathroom silicone last?
Good-quality bathroom silicone often lasts five to ten years, but heavily used showers may need attention sooner if ventilation is poor or the bead was badly applied.
Can I silicone over old silicone?
No. New silicone will not bond reliably to old contaminated sealant. Remove the old bead fully, clean the area and start again.
How long before I can use the shower again?
Check the product instructions, but most bathroom silicones need at least 24 hours before contact with water.
Related guides
Need help with the job itself?
We install accessible bathrooms, walk-in showers and wet rooms across Central Scotland.